Wednesday, September 12, 2012

Slipcover #3

Another couch!
Jolene and Susan were both brave enough to be my first customers with slipcovers!  Thanks to you both!  Here is Susan's couch before and after. . .


What a transformation!  Its so fun to change something old to something new!  Enjoy your slipcover Susan!

Napper

I was challenged last week with a new kind of project - thanks Tiffany!
I was given this bumper pad to make into a blanket/sleeping bag/some kind of keepsake:)  Do you have a bumper that you're not ready to part with?  It's just too cute to use for only 6 months?


Turn it into a "napper"!  (Kind of like a sleeping bag or a cushion/blanket/pillow combo:)


I started by removing all the binding from the bumper pad.  Then cut the bumper into 3 equal parts.  Open the top and bottom seams.  Align the 3 bumper pieces side by side and re-sew seams together (tops to tops and bottoms to bottoms).  Throw a piece of fleece fabric on top to fit and use ribbon for binding.  I made a pillowcase and attached it to the top for ease with washing the napper.  
  

It actually turned out almost the same size as a sleeping bag, so her son should be able to use this for years to come!

Wednesday, August 29, 2012

#2 slipcover!

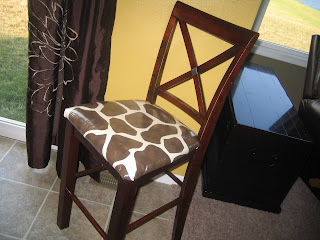
Thanks Jolene for being my first (along with Susan - coming soon!) slipcover customer!  This chair went together beautifully!  Still had a lot of cushion left in it, just needed an update and to cover up a couple holes:)


And what a fun fabric choice!  Giraffe!  


I love how it turned out!  What satisfaction delivering this and slipping it onto the chair so perfectly!  I love to sew!  :)


Curtain and cushions

I like to share projects I have done for others to inspire YOU and let you know what I can make for you!

This is a valance with hidden tabs on the back (see 2nd picture)


Seat cushion with ties for a little girls room (this is my "broken" chair posing for the picture!)


 A mattress/cushion for a doll crib:)   Lots of fun in store for this little girl!  :)


Blanket band. Complete with velcro closure.  A great way to display or just keep track of blankets!  I made 4 of these bands for her blankets, and she was planning to keep them all in a basket.  Great idea!


Two more dresses for the girls

I've had this tutorial filed away and finally put it to use!  Such a fun summery pattern!
Those are birds on their dress if you can't tell:)  I used a men's XL t-shirt from Dollar General and regular knit fabric (blue stripe).

It was time for family pics again, so I was on the lookout for outfits!  I spotted some fun gray zebra fabric at Joann's but wasn't sure what I wanted to do with it.  Something for the girls of course:)  Then I spotted this girl (actually her dress) in my Family Fun magazine and was inspired!!!  


What a fun, simple, and versatile dress!  Short sleeves in the summer and a long sleeve T under it for winter!  Layer with leggings and what a cute outfit!  So, I bought the gray zebra fabric and set to work!  Here is my version. . .


Mine turned out a bit more A-line.  I added the border at the bottom and button on top for eye appeal.  I loved the results!  You might have to wait til Christmas pics are sent out to see our family pics with these dresses, unless I post our pic on here sooner!  

Thursday, July 12, 2012

Summer scarf gifts

Need a summer girly gift?  You've got to try out these scarves!  I used this tutorial:
and then adapted it a little which I'll show below.  
I actually made these for a friend who is having a brunch for some ladies.  These will be tied to each of their chairs.  How fun is that?
 The tutorial says to serge the edges, iron 1/4" under, and then sew.  So this is how that turned out. 
 But, with the ruffles and how the scarf curls up when you wear it, I didn't like seeing that serged edge as much.  So, I tried folding under twice and sewing.  This worked but was time consuming.
 By the third scarf I had it figured out.  Rolled hems with your serger are the way to go!  It creates a more dainty hem with a great finished look for the scarf!
Look what fun you can have with lightweight fabrics!

I hope the ladies enjoy them!

Recovered kitchen chairs

When it comes to home decor I love unique, unexpected, conversation starters:)
Such as. . . 
this bold shower curtain
 Or my "coffee table"
 Or masking tape wall decor???  and burlap ruffled lamps all in ORANGE?
 I say it's FUN!
And now it is time to get my kitchen chairs into the FUN mode:)

After 9 years of wear and tear this is what the seat looked like - yes, off-white fabric chairs are not so kid friendly. . .
So what was the fabric of choice?
Giraffe of course!!!!!  
And I LOVE them!  :)

 I did make these kid-friendly:)  Through blog land I found out there was such a thing as iron-on vinyl.  I found the fabric I wanted, ironed this vinyl on, and basically got "oilcloth" fabric to cover my chairs with.  They wipe right up!  Hooray for giraffe print chairs!

One more funny story. . .
A couple years ago when giraffe print purses were just getting big I was in search of a new purse.  I asked my sister if I should go for the giraffe print purse, but she wasn't so sure about them.  I ended up getting a plain yellow purse instead.  So when I had the idea for this project I couldn't wait to tell my sis how I was covering my chairs.  Good thing I chose to use the fabric somewhere not very noticeable!  Haha!